
This year was a year to plan ahead. It has been a more optimistic year, as I am feeling better than I have in a long time, getting back into better shape, eating right — getting out of the pre-diabetic zone … all that stuff \”they\” tell you to do, but you take forever to get around to it.
So I made a bunch of stuff. Well, mostly for Christmas, but it was more than I usually make! The planning started in September with this idea that I would make something for everyone. At first, my brain went straight to knitting, but then I remembered how that went in years past. The thought was lovely, but hand-knitting slippers for 15+ people was — at the least — daunting. Especially since I didn\’t usually start the work until December due to a very long string of excuses to procrastinate: \”It\’s not even Halloween yet!\” \”It\’s not even Thanksgiving yet!\” \”The day after Thanksgiving is a much better start date!\” \”The weekend after the day after Thanksgiving is a better start date. Then I can get up the tree!\”
Etc.
While I pondered these things, I was partaking in another favorite procrastination pastime of mine: looking at other people\’s crafting ideas online. I came across a blog called \”It\’s Always Autumn.\” Well, Autumn, the blogger, has a fabulous post on polar fleece blanket-making, which you can find here. I thought this would be a great way to make everyone in my family something and not epically fail, for once, at total Christmas-making! Autumn\’s blankets were not the usual edge-tied type, and I was intrigued by how finished they looked, not to mention that the edge-tied way always seems to diminish the useful part of the blanket.
To prepare for making Autumn\’s sewn blankets, I used a zillion Joann\’s coupons and did a lot of shopping (online — duh! Okay, I am cheap and didn\’t pay for shipping. I picked the orders up in-store to cut costs) and cutting and planning, but the blankets truly did not take more than 2.5 hours each to complete. I made 11 blankets that way, finishing them with jumbo rick rack or bias tape.
Then, I decided to go off on my own a bit. Instead of using a trim of some ilk on a single fabric, I tried sewing two pieces (planned and cut with the same rounded corners as the originals) of fleece together most of the way, flipped them right side out and top stitched them together, holding the open area of fabric together, closing the hole I left to do the flipping. This actually created a very nice blanket, double thick! And I didn\’t do any quilt-style tying; the polar fleece fabric sticks to itself pretty well and they worked just great as they were. This style of polar fleece blanket took a little longer, like 3 hours, but it i worth it! I made four of these.
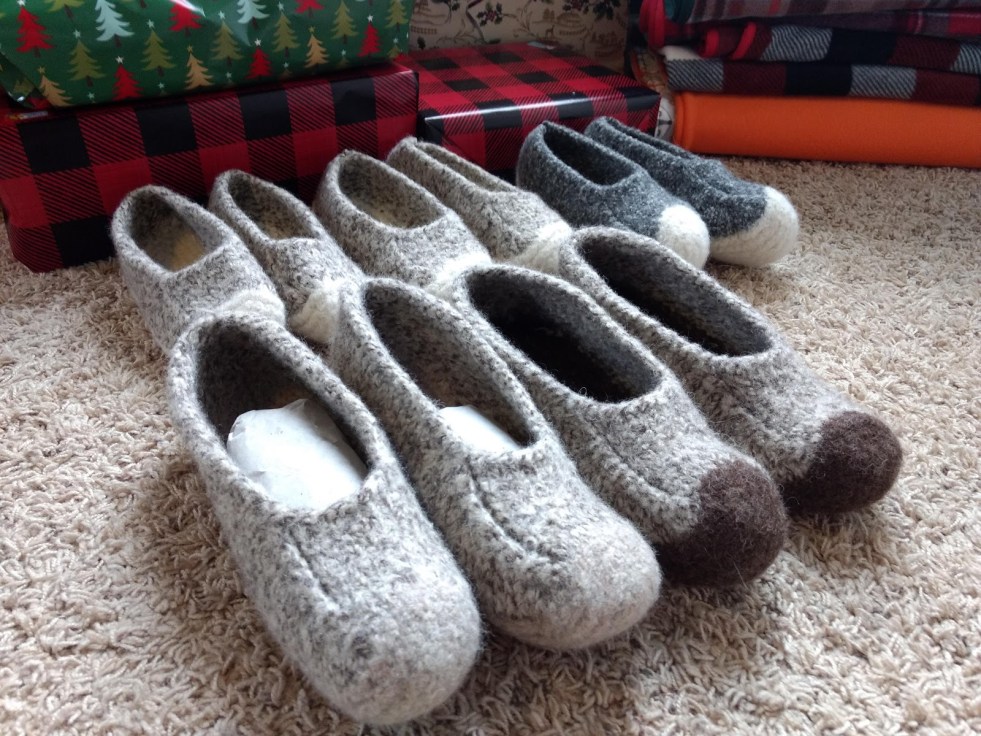
Here are mine:


A couple of thoughts if you decide to try this:
1. When using two pieces of fabric for a blanket, it gets a little tricky closing the hole while topstitching. Be very careful to fold the pieces in together to match the seam allowance you created when sewing them together in the first place. But also remember that polar fleece is a bit stretchy and, as such, is forgiving; you can pull a little and stretch it in place as needed to make it work for you.
2. I didn\’t get super picky about my two pieces matching. I did my best, laying them out on the floor together and using quilter\’s safety pins to hold them together for the initial sewing, starting my pinning from the center and working out. But I didn\’t freak out if during the sewing the edges sort of went a little askew. Life\’s too short and they looked fine — better than fine!
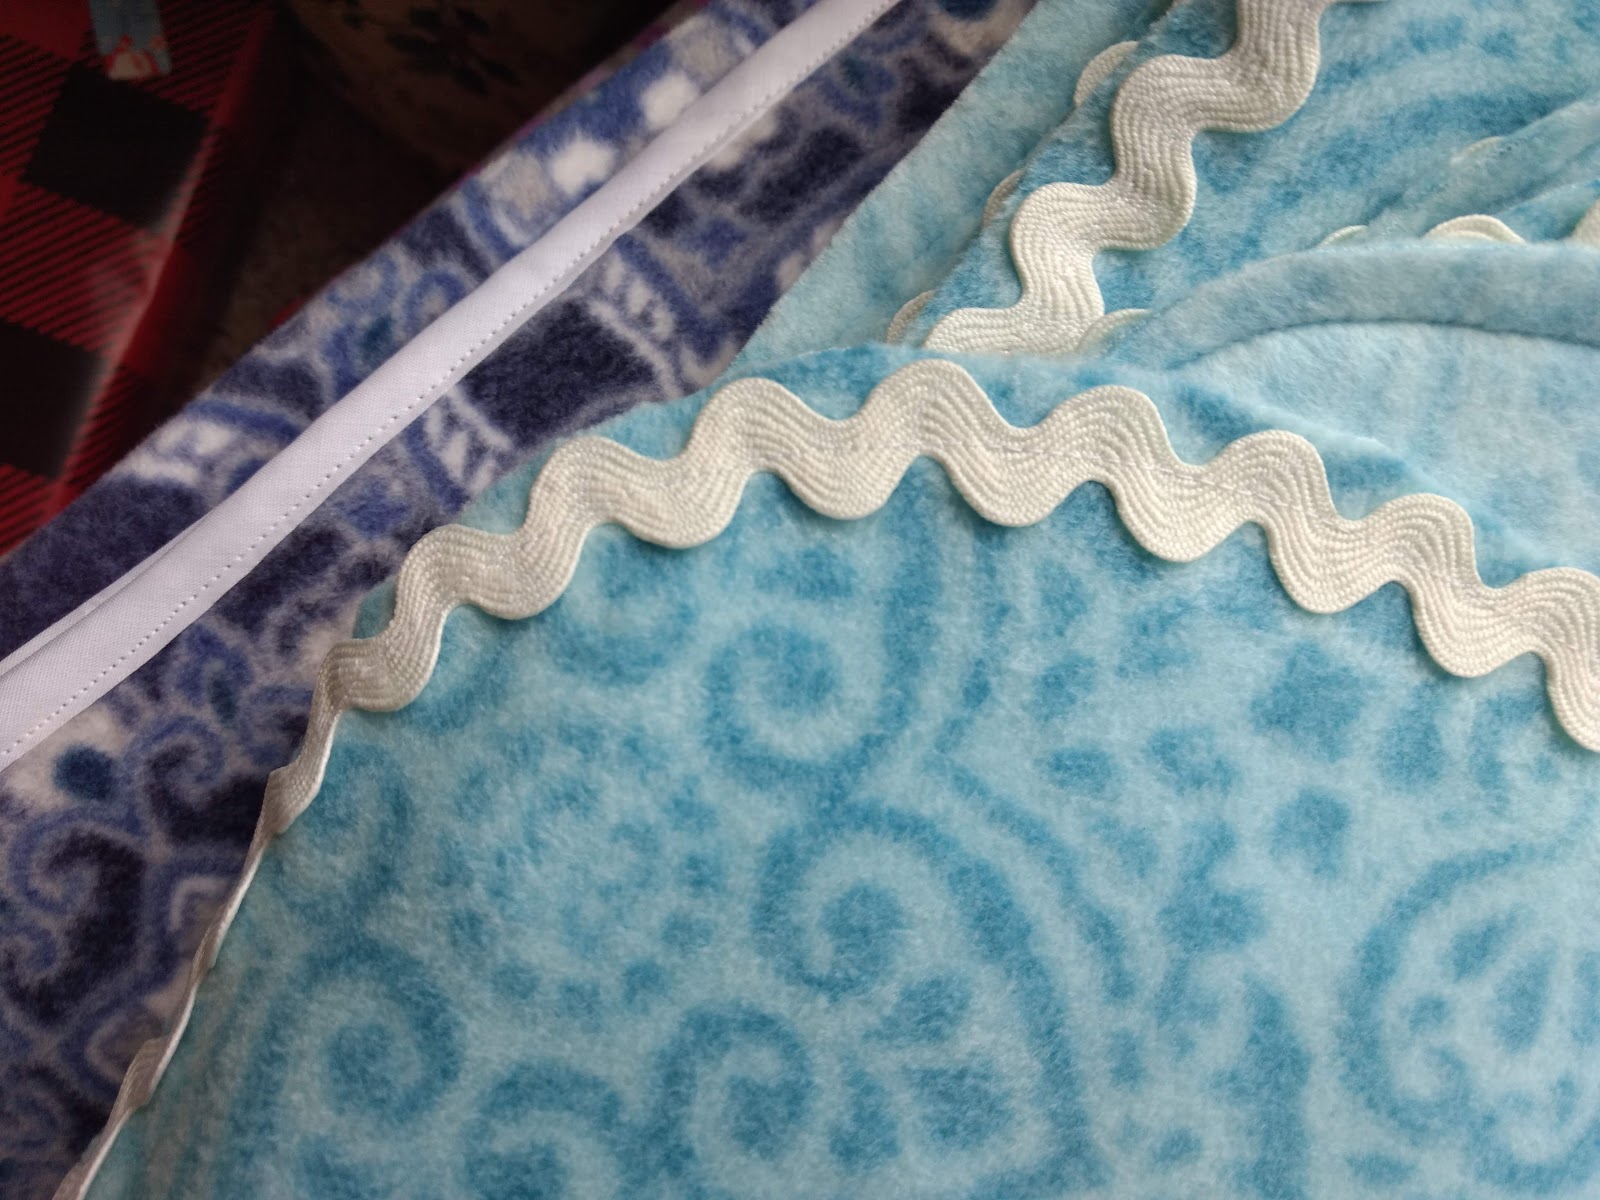
3. When using bias tape on a single fabric: As Autumn the blogger tells you, the single-piece blankets do take up to 3 packages of double-fold bias tape, depending on how big you make it, but your mileage may vary. My large blankets took about 2.5 packages a piece, using 2 yards each of 59\” wide Luxe Fleece.
I ironed my bias tape to get the kinks out of it, you know, where it bends around the cardboard in its little package? That annoys the crap out of me. Ironing it super hot with steam worked really well. And, after getting the hang of how it goes with sewing and connecting the new pieces of bias tape, I even pre-folded the successive pieces and ironed the fold into the new piece to save time. To make the new piece less bulky, I also cut the new piece into a point before folding it.
4. When using Rick Rack: BE CAREFUL IRONING IT!! I tried to treat it like the bias tape, not testing it, not thinking … it melted to my iron. Maybe try washing it and laying it flat to dry. Or read the package for care — I sure didn\’t.
5. Finally, I used a stretchy fabric needle in my matching and I had to lower the tension to handle the blankets with double thicknesses.

Let\’s circle back to the slipper in the first pic. I made 6 of them for Christmas when all was said and done (When I took this photo, one was still on the needles!). The pattern I used is \”Duffers Revisited\” by Mindie Tallack. I am in love with this pattern as it uses less yarn, and is thus less time-consuming than the lovely (and also slightly more expensive to make) \”Felted Clogs\” by Bev Galeskas. Other differences include a slightly less complex construction and \”finished\” feel to the Duffers finished product, including a single, instead of a double, sole as in the Felted Clogs pattern. There is also no rolled top on the Duffers, but if you are seeking a simple, solid, predictable pattern and need to make several, Duffers may be for you!
I used Fisherman\’s Wool and Cascade 220 wool for my Duffers and would consider trying Lamb\’s Pride or Ella Rae, too. I suspect I will need to remember that Lamb\’s Pride doesn\’t felt quite as far as the others. Things to keep in mind!
I also made my 9-year-old daughter Amy Rose a pair of fat socks using Red Heart\’s new Hygge yarn!! What a treat! It is a bit hairy, but not too much unlike some other eyelash yarns, and although it has the potential to split, my Size 9 Clover Bamboo dpn\’s worked out just fine. I haven\’t washed them yet — I\’ll keep you posted.

Next Post: New Year\’s Stuff